If you refer to yourself as a creative professional, chances are you have some sort of media management workflow. A couple years ago we wrote an article on our post-production workflow at the time. As is common in our world, a lot has changed over the past couple of years, and our post-production workflow has evolved to become more efficient, more redundant, and ultimately more failproof.
Having a reliable system for managing your media is extremely important for the lifecycle of your project. Mismanaging your media can lead to catastrophic circumstances, and if you’re not doing your due diligence you could end up losing the entire project. Imagine having to tell your client that you lost their project because you accidentally formatted their footage or your hard drive crashed. YIKES.
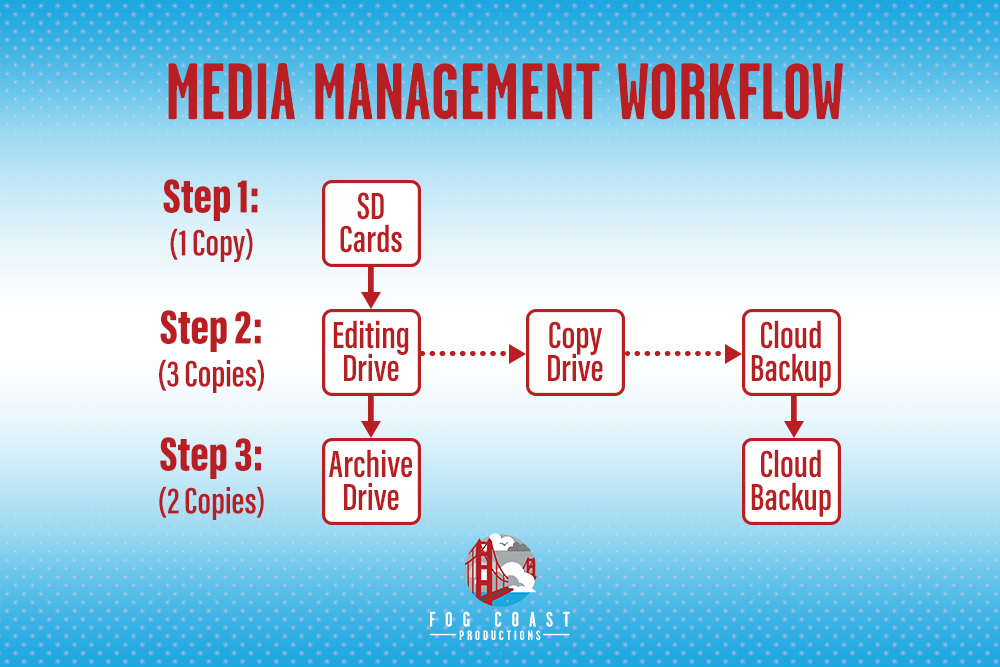
Below you will find our updated media management workflow for post-production, and the ways that we avoid potential project disasters.
Offloading:
Whether you’re shooting a 30 second promo, or a feature-length documentary, let’s make one thing completely clear – get that footage off of your SD cards ASAP. After any shoot the very first thing we do is offload our footage onto our editing drive. The editing drive is where we store our footage, project files, and scratch disks. This drive is the crown jewel of our media management process, and is extremely important to have a copy of (more on this in the next step). The editing drive we use is a 56TB G-Speed Shuttle formatted at Raid 5. The reason for this is because it gives us both redundancy and fast editing speeds. For more information on Raid formats and to figure out the best one for your workflow, i’d recommend checking out this page.
What’s Changed: If you read our original article, you know that we used to offload our footage onto at least two “field drives” immediately after the shoot. After offloading to two field drives we would take one of the drives and offload them onto our editing drive. We eventually learned that this was just time consuming and an unnecessary step in most scenarios. The reason we say most is because there are still some scenarios where offloading to two field drives is necessary. For instance, when you’re on location for multiple days and you don’t have access to your server or editing drive. Field drives have one purpose and one purpose only: to store your footage safely and begin the process of redundancy until you can get the footage on your editing drive.
Note: DO NOT format/delete the footage on your SD cards at this time. It is not safe to delete the footage unless your footage is offloaded to at least two hard drives.
Copying:
At this point, all of your footage should still be on your SD cards and fully backed up to your editing drive. Now this is where we introduce our media hero, the copy drive! The copy drive is quite literally a drive that makes copies of the editing drive. As we edit, the project takes on a different life form. We gather/create new assets, make multiple saves/renders of our projects, and produce a large amount of metadata. We demand a lot out of our editing drive and push it to the limits, which makes it more prone to crashes, overheating etc. Our copy drive is where we make copies of our project file, media, scratch disks, assets, etc, every hour. Yes, EVERY HOUR. However, we don’t do this manually or we’d be pulling our hair out. Instead we automate the process by using a software called carbon copy cloner. At the time of writing this article, this software is only available for mac. However, there are many alternatives out there for windows. This software automatically makes copies from our editing drive to our copy drive and ensures that we can pick up where we left off in the event that our editing drive goes down. Once all of the footage is offloaded to the editing drive, and then copied to the copy drive, we feel it is now considered safe to format your SD cards. However, if you have the luxury, I would still recommend keeping the footage on your SD cards until you need them – it doesn’t hurt.
Cloud Backup:
This step is the key differentiator from our old post-production workflow and our new one. As we continued to grow and our team members moved around during Covid, we knew that we had to have an off-site cloud copy of our assets that everybody could access. It’s also worth mentioning that we had a close call with a fire at one of our homes, which was a place where we were doing a lot of editing and storing our hardware while working from home during Covid. Luckily it didn’t cause much damage, but got us collectively thinking what would happen if it did.
We started exploring server solutions, and learned very quickly that it was just way too expensive and was not necessary, given the size of our team and our needs. We simply wanted a cloud copy of all of our footage and project assets (like our copy drive) that we could access from anywhere. After weeks of searching for this solution we realized it wasn’t so easy. Luckily we learned of what we like to call a google drive “hack”. This hack gave us unlimited cloud storage to google drive and allowed everybody within our organization to access the assets. Even better, we figured out a way to automate this process through a desktop plugin called google backup and sync. You can get unlimited google cloud storage with some thrifty maneuvering. Check out this article if you’re interested in how to access it.
Note: At this point our footage is now backed up in 3 locations (editing drive, copy drive, and google cloud). We have also completely automated this process with the help of carbon copy cloner and google backup and sync. So if we make any changes to the project or add any files, it will automatically be updated in all three locations.
Archiving:
Once the project is completed and approved by our client we move it into its final home, the archive drive. The archive drive is where we store all of the project assets forever. We do not delete files off of the archive drive. Rather, when it fills up, we just get another archive drive. It’s very common for a client to come back after the project is complete and request an iteration, add-on, or updated version. For us we work with a lot of start-ups that have a product and mission that’s constantly evolving. Therefore, their content is constantly getting updated over time. Our clients can trust that by having their project archived we can pull it up and work on it if need be, so everybody wins. It’s also worth noting that the project and assets are still archived on google drive. So there are 2 locations where the project and assets are archived. We recommend spinning up your archive drives every couple months to make sure they are in good working order.
Note: At this point we believe it’s safe to delete the files from your editing drive and copy drive
Conclusion:
We hope that our process helps improve, enlighten, or perhaps validate your media management process. Feel free to reach out to us directly if you have any questions!
Happy Creating!
Written By: Andrew Klein, Executive Producer, Fog Coast Productions