THIS ARTICLE HAS BEEN UPDATED AS OF 2/23/2021. YOU CAN FIND THE UPDATED ARTICLE HERE
If you refer to yourself as a video professional, chances are you have some sort of media management workflow. Having a reliable system for managing your media is extremely important for the lifecycle of your project. Mismanaging your media can lead to catastrophic circumstances, and if you’re not doing your due diligence you could end up losing the entire project. Imagine having to tell your client that you lost their project because you accidentally formatted their footage or your hard drive crashed. It makes me cringe just talking about it. Below you will find our media management workflow for post-production, and the ways that we avoid potential project disasters.
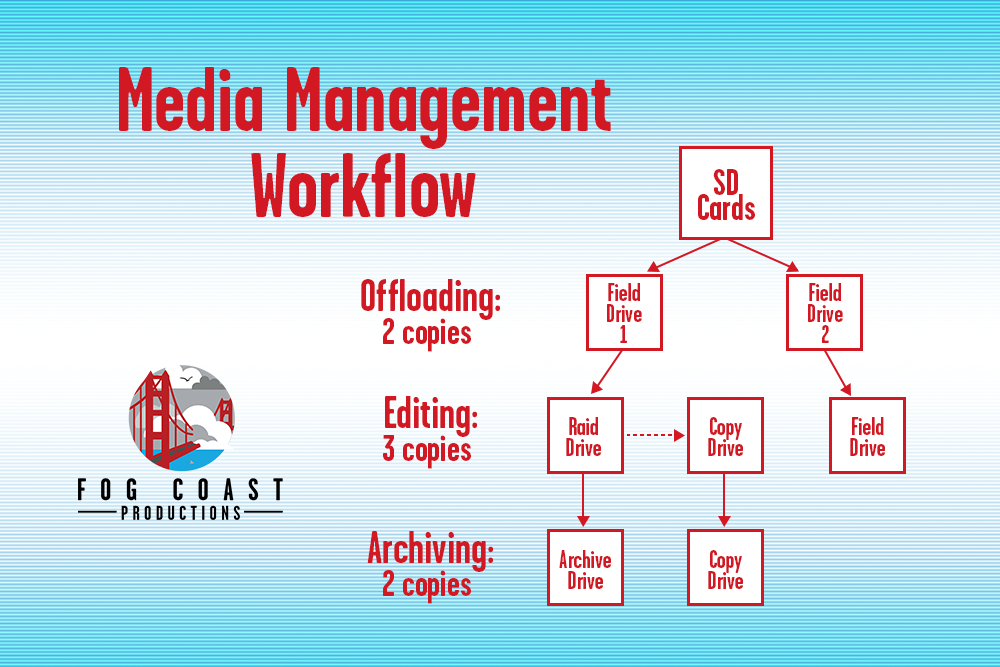
Offloading: Whether you’re shooting a 30 second promo, or a feature length documentary, let’s make one thing completely clear. Get that footage off of your SD cards ASAP. After any shoot the very first thing we do is offload our footage onto AT LEAST two hard drives. We like to refer to these drives as “field drives”. Field drives have one purpose and one purpose only: to store your footage safely and begin the process of redundancy. However don’t let the name fool you, unless we are shooting on location for multiple days, we do not use field drives “in the field”. It’s not necessary to whip out a laptop at the end of every shoot and immediately offload your footage on location. We’re just saying, whatever your circumstance, make sure getting that footage off your SD card is a priority as soon as you’re done with your shoot. Do not format/delete the footage on your SD cards until it’s on at least 2 drives, we can’t stress this enough.
Transferring: Once our media is on at least 2 drives, we take one of our field drives and transfer the footage over to an editing drive. The editing drive is the drive where we, you guessed it, edit our footage off of. For editing we prefer to use raid drives formatted at RAID 0 for fast editing speeds. The editing drive is where we store our footage, project file, and scratch disks. This drive is the crown jewel of our media management process, and is extremely important to have a copy of (more on this in the next step). Once the media is on our editing drive we feel it’s then safe to remove the footage from ONE of the field drives if you need the space.
Copying: If you’ve been following our process you know that we still have our media on at least 2 hard drives at this point; one field drive and one editing drive. Now this is where we introduce our media hero, the copy drive! The copy drive is quite literally a drive that makes copies of the editing drive. As we edit, the project takes on a different life form. We gather/create new assets, make multiple saves/renders of our projects, and produce a large amount of metadata. We demand a lot out of our editing drive and push it to the limits, which makes it more prone to crashes, overheating etc. Our copy drive is where we make copies of our project file, media, scratch disks, assets, etc, every hour. Yes, EVERY HOUR. However, we don’t do this manually or we’d be pulling our hair out. Instead we automate the process by using a software called carbon copy cloner. At the time of writing this article, this software is only available for mac. However, there are many alternatives out there for windows. This software automatically makes copies to our copy drive and ensures that we can pick up where we left off in the event that our editing drive goes down. If you’re really strapped for hard drive space i’d say it’s ok to now delete your footage from the other field drive. However, I like to keep my footage on there until the project is completed as a double safety net. And that brings me to our final step.
Archiving: Once the project is completed and approved by our client we move it into its final home, the archive drive. The archive drive is where we store all of the project assets forever. We do not delete files off of the archive drive. Rather, when it fills up, we just get another archive drive. It’s very common for a client to come back after the project is complete and request an iteration, add on, or change. For us we work with a lot of startups whose product and mission is constantly evolving, therefore their content is constantly evolving over time. Our clients can trust that by having their project archived we can pull it up and work on it if need be, and in that case everybody wins. We still like to keep our project files on the copy drive even after the project is archived. This ensures that the media is still backed up in multiple places. We recommend spinning up your archive drive(s) at least once every 2 weeks to make sure they are in good working order.
And there you have it fellow video makers. We hope that our process helps improve, enlighten, or perhaps validate your media management process. Feel free to reach out to us directly if you have any questions on the drives and tools we use!
Happy Creating!
Written By: Andrew Klein, Executive Producer, Fog Coast Productions